Sunday, November 24, 2013

Kitchen, nearly complete...

Hopefully there isn't a limit to the number of photographs that one can load up in one blog post. The biggest project that we tackled in the house was the kitchen. Here are a few photos from when we purchased the house.  Note the wall-to-wall carpeting and the placement of the stove in the middle of the room.


We uncovered a number of surprises when we took down the cabinets and stripped the fake wood veneer off of the walls. Don't forget to check out the photos from this post when we were in progress. The veneer rip out caused major damage to the walls of the nook. The plaster guys did an amazing job of smoothing it all over in the end.


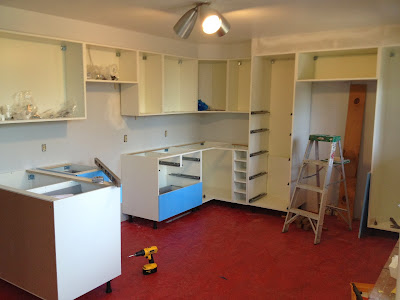
In progress...


Forbo Marmoleum Bleekerstreet sheet flooring is in!


We hired a handyman to build and install all of the cabinets. Best money ever spent!


Jarrod and a woodworker friend designed a built-in bench for the nook and the handyman built it.


And now it is a super functional, really amazing space. We spend a lot of time in this room.


Rejuvenation hardware on IKEA ABSTRAKT cabinets


Visiting with the courageous squirrel through the nook windows.


Cast iron sink and dark grey quartz (ground) counter tops


So what could possibly be left, you say? Aside from 20 years of enjoyment, we are planning to do a back splash using Fireclay Thinbrick. But knowing us, it will take a few more months before we decide on a color...

Saturday, November 23, 2013

It has been nearly a year since we purchased this house and I've done a very poor job of keeping up with the documentation of the changes!

I'm quite possibly the most pathetic home restoration blogger. I take a lot (A LOT) of photographs! However, it will never be ready for a photo shoot so here goes, I'm throwing my fantasy of having a spotless home out the window, and I'm going to document this beauty as a lived in home.
First up - the end of the brick saga - you remember, the way the brick appeared when we purchased the house?

After a failed attempt at soda blasting (brick just crumbled) and an attempt at citrus stripping (which worked, but would have taken a year... we painted them (ahem, Jarrod painted them).


 And unless you are right up on the brick, you wouldn't be able to tell they had been painted. WIN!


Saturday, March 30, 2013

The brick saga...

After a lot of consideration and looking at the quickly dwindling house budget (flooring is like the most expensive thing ever!) we have hesitantly decided that painting the brick is the best way to deal with it. I think that we have come to the conclusion that some day we would like to tile the whole fireplace. Alas, we both have very expensive taste in tile and with close to 200 sq/ft to tile, we just can't do it (now).

Jarrod stopped and picked up a few paint samples and did a test on the brick. From a few feet away it is quite convincing! The mortar in the rest of the house is far more pink, so it will take some tweaking to get it to match, but I think that this will be a reasonable alternative in the short-medium term.


Sunday, January 27, 2013

Steady Progress

The house doesn't look all that much different this week compared to my post on January 4th, but that doesn't mean that we haven't been working!

As far as we can tell, the laundry machines have always been in the kitchen. We decided that in order to open up the kitchen space, we would move the laundry into the basement. Fortunately, there is a great spot for the laundry at the bottom of the basement stairs. However, the move required us to move the plumbing for the washer, the 220 electric for the dryer, and drill a giant hole in the wall for the vent. All done!

 Jarrod and I were successful in removing all of the cabinets from the kitchen.


Unfortunately we uncovered a bit of wall damage. First, water damage (curse of the flat roof?) in the corner of the kitchen.


As well as a bit of plaster damage to the breakfast nook area from removing the fake wood paneling. Really, did they need that much glue to hold up the fake wood? I expect not.


But never fear! The wallpaper is gone and the plaster and drywall guy will be over tomorrow to start the repair in the kitchen. I can't wait to see what it looks like when it's all clean and new.


I know that you have been anticipating a brick update! First the sad, sad news. We attempted soda blast the brick. It worked, but it also caused major damage to the brick. We were very sad.


But get this - the soda blasting uncovered a new color of brick! What? Blond brick? So, it turns out that the bottom of the fireplace is blond brick and the top is red. Wow.


Jarrod has been attempting to strip the brick a little bit at a time. Basically, he paints on this citrus stripper (that doesn't stink!), covers it in plastic, and then comes back the next day using wire brushes. It is an amazing result. It's just a seriously major bummer that the entire expanse of brick is likely about 200 square feet. The 8 bricks that he has completed took about 3 hours of labor. Sadly, this is probably not a viable solution.


 Finally, last weekend Jarrod and I removed the vanity and toilet from the upstairs bathroom. Here it is pre-removal.

Pieces gone!


Finally, with a bit of elbow grease (check out the back wall in the picture above!)


It's funny, I keep thinking that we haven't accomplished much. I need to remind myself that we both work full time, have two small children and just took on a crazy basket case house. We are really, really, really lucky that we get to do this work while living in our very comfortable current home.